CAUTION pigment film is the wrong type for dye ink.
iP8720 Dmax Black Dye Ink™ Ink and Cleaner Kit
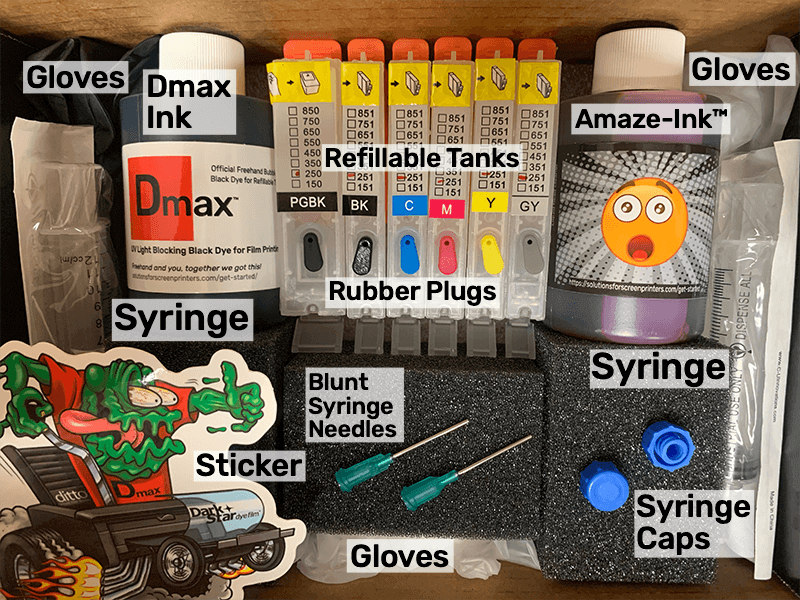
CONTENTS
DO NOT THROW AWAY ANY PARTS
(1) 130mL bottle of Dmax Black Dye Ink™
(6) refillable ink cartridges
(6) rubber fill hole plugs (may be colored or black, color does NOT matter)
(6) orange tank sleds used for storage or filling ink outside of printer
(2) industrial syringes (for Dmax black ink filling and Amaze-Ink™ clog busting)
(2) blunt needles for syringes (attaches easily for the ink fill process)
(2) syringe caps (safely stores any ink left in syringe)
(1) 129mL bottle of Amaze-Ink™ Liquid Inkjet Clog Buster
(2) pairs of gloves

Have an extra bottle of Dmax Dye Ink on hand.
The ability to print quality films through the Pixma iP8720 happens because of two key Freehand manufactured technologies…Dmax Dye Ink and AccuRIP™ Emerald Software for Bubble Jet printing. You simply will not achieve the same success with any other products.
Freehand and you, together we got this!
Freehand’s Dmax™ Ink Starter Kit is used with AccuRIP™ Emerald Software!
SETTING UP FOR SUCCESS!
Step One:
Setup your Canon Printer using stock Canon inks. Contact Canon directly if printer is not printing and/or producing a clean test print from the Canon Printer Driver. If operational, continue to step two.
Step Two: INITIAL FILL
(a) remove yellow air hole tabs on all 6 tanks while still in their orange sleds. Attach the blunt fill needle to the syringe.
(b) wearing supplied gloves fill the syringe with Dmax Black Dye Ink™.
(c) with the cartridge in its orange sled fill, but do not overfill, one cartridge with dye. Insert the syringe deep but not to the cartridge bottom and inject ink slow enough for the sponge to absorb. Don’t worry about any black ink left in the reservoir as it will be absorbed into the sponge eventually. Repeat this step for all cartridges until you have a full set of 6 tanks filled. Keep all filled tanks upright.
(d) plug each fill hole with provided rubber “L” shaped plugs. Plugs need to fit snug enough to prevent any dye ink from splashing out during transport and/or installation.
Step Three:
Lift printer hood. With the print head centered and not moving remove the power plug from back of printer. Then remove all Canon color cartridges.
Step Four:
Carefully remove each filled tank from its orange sled without breaking the tab or microchip. Tanks and slots in the print head are labeled with coordinating colors. Match then insert into the proper slots. A steady red light signals a successful install. Close printer lid (cover), plug the power cord into printer. The printer will charge the inks. Steady white light indicates ready mode.
Step Five:
Install and setup AccuRIP™ Emerald Software by Freehand, Make sure that the All Black Ink™ feature is ON so all slots are being used during printing. Refer to your AccuRIP™ Emerald documentation. Load a few sheets of plain letter size paper into the printer. Open the printer’s OEM driver and run a Nozzle Pattern test print to verify the printer is clean and BLACK ink is properly printing. If necessary run a cleaning routine.
A clean Nozzle Pattern test print means you are ready to start printing films.
When is it time to refill?
After the cartridge chips run down initially you will reset the Canon to continue running with THE SAME CHIPS; the chips will no longer report ink levels or display any red lights on the print head. This is the goal, they are NOT needed when using a bulk refill system. Now you will simply run the printer until the first sign of a light print, then add more ink to the tanks. Be careful not to overfill cartridges. Note: tanks can be filled while in or out of the printer. Tanks filled while in the printer will continuously operate after the first “printer reset”*. Tanks removed for filling will require “printer resetting” which involves pressing the function button. Fast and easy to do, generally requires pressing the function button once – holding for 8 seconds until the Power button white light flashes once.
* Printer reset: a Canon feature. The printer acts as a cartridge chip resetter allowing an exhausted chip to continue running without the need for an external chip resetter. Windows users will easily reset the tank chips directly from their computer using the Canon utility, or follow the same process shown below for Apple users.
Apple users will easily reset the tank chips directly on the printer using the buttons on the front of the printer.
For those that refill tanks remaining in the printer this is a “one-time” reset process. No reset action is required. For those that remove tanks each time they refill they will repeat the above described reset one time per refill session.
Thank you Canon for offering end-users a solution to prevents costly downtime!


